Showing posts with label DIY. Show all posts

Friday, August 20, 2010

Adventures with Mei Tai

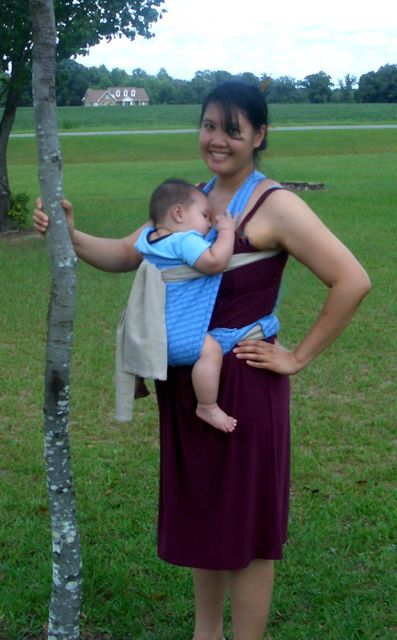
Getting sleepy
My son is heavy and I have a bad back, so I've been experimenting with baby-wearing. My first foray into the world of baby-wearing mommies was with a homemade Mei Tai.  A Mei Tai is an Asian style baby carrier that is typically worn on the front but can be worn on the back.  Long straps allow the wearer to criss cross them in the back for better support and distribution of weight.  The waist strap also helps take the weight off the shoulders and back by placing it across the hips.

Mei Tais are very simple to make a there are a host of tutorials and instructions available on the web.  I looked at a few and combined a lot of the features I liked best in the simplest Mei Tai styles.  It's basically a rectangle (roughly 16x20 inches) with very long straps (60" on mine) made of double, triple, or even quadruple layers of some sort of durable but soft fabric with minimal stretch (I used a suit weight silk that I bought before I was pregnant but never used) and double or triple seams with high quality thread every where for strength.  If you are very short, slender, or do use wrapping styles that require going around the waist or back twice, you can get away with shorter straps.

I'm not sure if it's my bad back, but it wasn't as comfortable as I had hoped it would be.  I will try making one more in the near future and seeing if any of the modifications I have in mind help. I would definitely recommend making very wide shoulder straps (6" or more) and padding with an internal layer of quilt batting or thick fleece.  My straps are about 5" and cut into my shoulders after a few minutes.  I did put some padding in the main body to make it more comfy for my son, but he doesn't seem to notice it.  I think I will use a cushier material for the seat pad in my next Mei Tai.  Also, if you think you'll be using it a lot or have a baby who falls asleep easily, I would say to try one of the patterns that includes a sleeper hood.

Mom's verdict:  It is nice to have my hands free for a change.  If I rest his bottom on a table or counter top while I'm doing a quick chore, I don't have to worry about him making a sudden movement and falling or hurting himself in some way.  It's also very useful for quick in-and-out trips to the store because I don't need to worry about the stroller or getting a cart for him to sit in when I'm only purchasing one or two items.  Some features I would like in my next Mei Tai are a utility pocket for keys and such when out on a walk, a detachable hood, wider padded shoulder straps, and a seat cushion for the baby.

Baby's verdict:  He's hot natured and sometimes gets a bit over heated even though it's made out of silk and cotton.  He's also in a wiggly stage and gets tired of being in it when he's in an active mood.  When he's tired, he has no problem falling asleep in it but would probably stay asleep longer with a hood for keeping his head positioned.  He would prefer a higher seat that allows him to nuzzle my shoulder.

Making one and using it has given me a much clearer idea of what my unique needs and wants are in a carrier, so I have some interesting plans for my next Mei Tai.  When I finish it, I'll be putting up the pattern so you can make your own if you like what you see!

For anyone making a Mei Tai for the first time, here's a tip:  this project will take much longer than you think it will for just being a rectangle with straps.  It took about 4 hours of sewing not including the cutting and prepping.  The double stitching and reinforcing take a long time.  I didn't believe it when I read others saying it, but the straps truly are the most time consuming part of the project.

Tuesday, August 17, 2010

DDT 8 -- How to Make Prefolds for Free!

There are many items around your home that can be repurposed or recycled to make diapers before you throw them away.  Using a serger or a reinforced zig zag stitch, you can have a sizable collection of prefold diapers using items you may have thought had outlived their use.

Items that make great diapers:

T-shirts
Sweatshirts
Flannel or cotton knit pajamas
Fleece blankets
Fleece pullovers
Hand towels
Bath towels
Soft woven cotton fabrics like well-worn, lightweight twill
Just about anything soft, absorbent, 80% or more cotton big enough for a diaper


What to do:

For lighter weight fabrics like flannel or t-shirts, I've had the best results using 2-3 layers and sewing a soaker pad in between them made of a doubled layer cut from an old towel or fleece.  Another approach is to use 2 layers with 4-6 soaker layers of t-shirt material or flannel.

For heavier fabrics, like towel weight material or fleece, I've found that 1-2 layers with a 1 layer soaker is sufficient.

Cut the fabric for the size you need (measurements below).  Position outside layers with the wrong sides facing inside.  The soaker should be about 1/3 the width of your diaper, centered and positioned as the middle layer.

Using a straight stitch, sew through all layers of the diaper down both sides of the soaker pad lengthwise.  Go around the outer edge of the diaper with a serger or reinforced zig zag stitch.  Trim loose threads.  You're done!


*Sizing:

Preemie (up to 7 lbs)
9.5" x 13"
3" x 13" soaker

Newborn (4-9 lbs)
9.5" x 14"
3" x 14" soaker

Infant (7-15 lbs)
12" x 16"
4" x 16" soaker

Regular (13-35 lbs)
14.5" x 21"
4.5" x 21" soaker

Toddler (25+ lbs)
17" x 23"
5" x 23" soaker

*These are the standard dimensions of the most common prefold sizes.  The weights are very flexible.  My 20 pound 6 month old can still use preemie size prefolds, but they are low-rise and not absorbent enough for sleeping or napping unless they are doubled in a heavy duty cover.  When my son was in the suggested weight range for infant prefolds, I had to fold down the front up to 6 inches to make it fit inside the cover, which added a lot of bulk to the front.  I still have need 3-4 inches of front fold when I use infant size.  Even the preemie size had to be folded down 1-2 inches until he was about 4-5 months old.  I recommend using the preemie or newborn dimensions for most babies under 15 pounds for a slimmer fit and a lower rise.  In fact, I would suggest shortening the diaper to 12" for babies under 10 pounds if you are trying to achieve a more custom fit.

Tuesday, July 27, 2010

DDT5 -- Choosing Diaper Fabric

There are a few things to consider when selecting fabric for a diapers.  The two main characteristics you want to think about are absorbency and comfort.  The cloth needs to absorb quickly and not irritate sensitive skin in a constant contact situation.

For absorbency, I've found that bamboo fabrics are are fast and hold a lot of liquid without a lot of bulk, cottons are very absorbent but tend to be very thick, cotton flannel is absorbent even though it isn't thick but doesn't tend to be the most durable with frequent washing, and fleeces are good at wicking away moisture for the driest feel.

The most comfortable, soft fabrics I've found are bamboo blends.  Bamboo velour is very soft and fluffy.  Bamboo fleece is some of the most luxurious I've felt.  Other benefits are the almost nonexistant shrinkage and the antibacterial properties of bamboo.  Cotton is also very comfortable, especially french terry which is also a very effective liquid absorber, but some flannels and terry can be on the rough side.  Fleece is hit or miss depending on what it's made out of and if it's anti-pill or not.  I've used polyester fleece remnants and some of them work well, but the ones that pill leave marks on my baby's skin.

Because various types of fabric are have tactile differences and do not interact the same way with moisture, I've found that there is not really one all-purpose fabric that is perfect for every diaper project.  Even though cotton, bamboo, and hemp can be very good at absorbing wetness, they aren't always good enough for heavy wetters or night time use.  Fleece tends to be the best for that and polyester is the driest feeling and fastest wicking.  Polyester fleece also releases waste quickly with no staining in my experience.  For reusable wipes and diaper liners, I've found that having a thick side (such as terry cloth or polyester fleece) and a soft side (such as cotton knits or bamboo fleece/velour) is best.  The thick side can be used for getting the bulk of the mess and the soft side for gentle clean up.  When used as a liner, I like to fold it so that the soft side or the driest feeling side, depending on the fabric used, is on the outside and the most heavily absorbent fabric is on the inside.  Ultimately, you'll have to decide what fabrics and combinations work best for you.

To read more about the types of fabrics people are using for diapers and the pros and cons, I found this article to be very informative:

http://www.thethreadedbranch.com/pages/newfabricsarticle.php


Tuesday, July 20, 2010

DDT 4 - DIY Cloth Diaper Supplies

Making your own cloth diapers and diaper covers isn't hard at all.  You might be surprised at the materials you already have in your home like old towels or old flannel pajamas that you can repurpose for diaper making projects.  It's great practice and will give you a feel for the absorbency levels of different types of fabric.

Even if you're using materials you already have, you'll probably need to supplement with a few other items to make anything outside of a basic prefold or contour diaper.  Here's a list of cloth diaper making basics and some of my favorite places to find them.


Basic Supplies

  • Fabric (flannel, terry cloth, french terry, velour, fleece with no more than 20% polyester content)
  • Elastic (1/4 inch garter, baby garter, Lastin, fold over elastic)
  • Hook & Loop (Aplix, soft Velcro, touch tape)
  • PUL fabric for covers and outer shell of AIOs and pocket diapers
  • High quality thread (use polyester for covers and items that need to be waterproof)


Suppliers

SewShoppe.com - They have almost everything imaginable for your baby sewing needs including diaper sewing notions that are difficult to find anywhere else, but shipping is a little high so it's not ideal for small orders

CelticCloths.com - PUL, fabrics, elastics, and patterns.  Great deals in their constantly changing clearance inventory.  You'll want to check this regularly.  Shipping as low as under $3.00 for small orders.

GreenThumbFabrics.com - They have some of the lowest prices for bamboo fabrics, but don't always have everything in stock.  A good value if you're not on a time limit.

NaturesFabrics.com - The best selection of organic fabrics I've seen in one place, and the prices are reasonable.  They recently added PUL to their inventory.  For those with very ambitious projects in mind, they also sell some of the best priced bolts of fabric I've found thus far.

DenverFabrics.com - Huge selection of conventional cotton fabrics and fleeces and everything else you might need for your nondiaper sewing projects.  Reasonable prices.  Frequent sales.

Etsy and Ebay - Find diaper cuts, remnants, or full yardage of PUL, fabric, and other supplies from other DIY moms selling their extras.

Tuesday, July 13, 2010

DDT 3 -- Free Cloth Diaper Patterns

Here are free downloadable patterns for anyone who wants to try their hand at make a few diapers.  Everything from AIOs, pocket diapers, contours, fitteds, and covers!

Rita's Rump Pocket Diaper - (patterns for covers, AIOs, contours, and more also available)
Little Comet Tails Not so Flat Wrap (I have personally used this pattern as a contour diaper and used it a starting point to create my own covers and AIOs.  It has a very generous cut, which is great as a contour.  For covers and AIOs, I have to trim it down in the crotch and/or lengthen the pattern for the best fit.)
Wee Weka Pocket Nappy (My personal favorite.  It didn't start fitting that well as a pocket diaper until my son was about 4 months old as the rise was too high.  Now that it does, it's a very nice slim fitting diaper even with night time stuffings.  I did, however, use the pattern to make a diaper cover with an adjustable rise, and it was the only cover I had the fit well for newborn use.  It still fits great even now.)

Come back next week for my favorite DIY cloth diaper supplies and suppliers!

Tuesday, June 29, 2010

DDT 1 -- How to fold prefold diapers

This is my first installment of Diaper Duty Tuesday (DDT) where I'll be discuss cloth diapering how-to's, tips, patterns for sewing your own diapers and covers, and everything else related to cloth diapers!  Today I'm tackling the mysteries of the prefold which is simultaneously the simplest and most intimidating cloth diaper, but they are a wonderfully economical cloth diapering choice that can be adjusted to fit a wide range of sizes regardless of the size of the prefold.  In fact, I'm still using preemie size prefold diapers on my 20-pound, 5-month old son, and he still has some use left.  The biggest issue with them now is not the fit but that the amount of cloth is becoming insufficient for his super soaking capabilities.


Many people, especially grandparents and other part-time caregivers, are turned by prefolds because they don't understand how to make them fit the baby.  There are a few different approaches to putting on prefold diapers, and I've tried several.  Of the methods I've tried, this one gives the slimmest fit and most protection against dirty diaper blowouts.  I've leakage problems with other fold styles, but the only time I've ever had a mess with this one is when  he decided to go for round two during the diaper change!


Folding prefolds with a fastener


1)  Lay the cloth diaper flat under the baby with the top edge at the desired waist height.


2)  Fold the portion in front of the baby in thirds so that the hugs baby's bottom snugly.


3)  Lift the folded part over the baby's front.


4)  Fan open the top of the diaper over your little one's belly.


5)  Fold down if there is too much excess cloth at the top.  If it's a little too high, you can tuck it down under the diaper cover.


6)  Fasten with pins or Snappi if desired.


7)  Put on the diaper cover.  Make sure all the diaper is tucked inside the cover or you'll end up with leaks.

It looks like a lot of steps, but it goes quickly once you've done it!


Folding prefolds without a fastener

It's easier to lay the cloth diaper and cover under the baby at the same time if you aren't using a pin.  Make sure the edges are even before you place them under baby's bottom (refer to picture #2 above) and follow the same steps as outlined above.

Tuesday, June 15, 2010

5 Ways to Go Green While Saving the Green

All over the country young adults who came of age in the world of PETA, animal rights, global warming, conserving resources, and Captain Planet are searching for ways to live life and raise their children in an earth friendly, environmentally conscious way. Sounds like a big job? You may be closer to living a greener lifestyle than you think. Here are 5 ways to incorporate earth friendly habits into your parenting routine by following the old mantra "reduce, reuse, recycle". You'll even save some money while you're at it.
1) Try cloth diapers. Diapers and wipes are the biggest source of infant consumer waste. My son goes through 20-25 diapers per day. That's 150+ diapers a week and over 7,800 diapers in a year! Switching to cloth diapers even just part time will literally keep thousands of disposable diapers out landfills. For an extra eco-friendly choice, use reusable cloth wipes instead of disposable. It may seem old fashioned, but cloth diapering for modern moms is easier than ever before! Stay tuned for more information later this week on cloth diapering resources and how to get started.
2) Accept hand me downs. Waste not want not. Reusing items prevents them from being thrown away or deteriorating from age while waiting in storage. When your baby outgrows his hand me downs, you can keep the cycle going and pass them along to another family.
3) Shop used. By purchasing existing baby supplies, you decrease the need for manufacturers to produce more which conserves our resources. Often times older products are better made, so you will be getting a higher quality product for less money. This in turn also means you'll that another baby will be able to inherit these items when your infant is done with them.
4) Preserve the resale value of your baby supplies. Infants grow so fast that much of your gear will be in great condition when your little one stops using it. Used baby items sell very well on Ebay and Craigslist. Saving as much of the of the original packaging and instruction manuals and taking care of your infant's clothes, bottles, toys, and other paraphernalia will make it easier to resell and fetch the highest price. If you decide to pass them down rather than selling, the original boxes and intact instructions will be very appreciated by your friends and family. Either way, you're keeping baby items that would otherwise still have a lot of life in them out of the garbage and out of your closet.

5) Recycle by finding a new use for seemingly "junk" items. For example, the boxes for bulk diaper packages make wonderful designer storage boxes. Use scrap fabric or recycle gift wrapping paper to cover them over with fun designs and pretty colors. The boxes already have handle cut outs so they're great for a variety of uses. Have different sizes? Make a nesting storage set and give it to an expecting mother as a unique, handmade baby shower gift.
Image: Salvatore Vuono / FreeDigitalPhotos.net